There will always be some kind of ambient noise on the HF bands. It may be either man-made (QRM) such as pulse noises from vehicle ignitions or natural (QRN) like lightning.
You probably have heard the old ham saying, “You can’t work ‘em if you can’t hear ‘em.” When we can’t hear signals well, it’s easy to miss a lot of potential contacts–or even some rare DX. So how can you improve your odds?
Just about all brands of HF radios have features that will help reduce noise and improve your ability to hear signals. I’ll be referring to controls you’ll find on the Icom IC-7300 HF Plus 50 MHz Transceiver, a very popular rig. You’ll find the same or similar controls on most transceivers.
The best way to learn how to use these features is to get on the air and experiment with them. Once you’ve discovered which ones best suit your needs, make them part of your regular operating routine.
RF Gain
>Helps separate signal from noise
You’d think cranking the RF Gain fully clockwise would help improve your reception. I used to think so. But as it increases signal strength, it also increases the noise level. A better strategy is to “ride” the RF Gain. Proper control of the RF Gain is one of the most powerful tools a ham has for digging weak signals out of the noise.
As counterintuitive as it seems, by turning down the RF Gain and increasing the AF Gain, you can sometimes pull out a signal that was previously in the noise. The human ear is a great discriminator. If the receive signal level is reduced enough that the background noise is lessened, then the audio level can be increased to a point where you can hear the signal better.
The purpose of the RF Gain control is to allow the operator to limit the range of the AGC (Automatic Gain Control) to some degree. With the IC-7300 tuned to a signal, turn the RF Gain to the 11 o’clock position, turn the AF up to a comfortable volume, then turn the RF Gain down until the background noise nearly disappears. Adjust the AF control as needed to the optimum audio level.
Noise Blanker (NB)
>Reduces/removes pulse noise
The Noise Blanker eliminates pulse-type interference like the noise from car ignitions and other man-made sources. They have no effect on reducing naturally occurring, ever-present atmospheric noise.
How does it work? A Noise Blanker samples an off-the-air signal at a very wide bandwidth. If a noise pulse is found, it briefly turns off the audio to the receiver for the duration of the pulse and passes the remainder of the signal. The Noise Blanker becomes considerably more effective at larger bandwidths as long as there are no strong signals present in the passband.
The NB produces some distortion on sideband signals, but it improves overall copy. On the IC-7300, pushing the NB button for one second opens the Noise Blanker menu on the right side of the display. There are three setting options: Level (level where the Noise Blanker activates, 0-100), Depth (noise attenuation level, 1-10), and Width (blanking duration time, 1-100). It’s recommended to set the minimum width needed to get rid of pulse noise.
Noise Reduction (NR)
>Reduces noise/makes signals more readable
The Noise Reduction function reduces random noise components and enhances signals that are buried in noise. By removing the noise, the improved audio makes it much easier to understand distant and weak contacts.
DSP technology has made it possible to reduce static and white noise, helping to bring signals out of the noise. It uses digital signal processing to analyze the signal and sort noise from signal, reducing what it determines to be noise. In the process, some distortion is created. The higher you set the NR level/algorithm, the more hollow and distorted the audio on sideband. But the technology continues to improve as new radios come on the market, making voices sound more natural.
On the IC-7300, pushing the NR button for one second opens the noise reduction menu where you can change the NR level settings (0-15).
Twin PBT
>Rejects interference from nearby signals
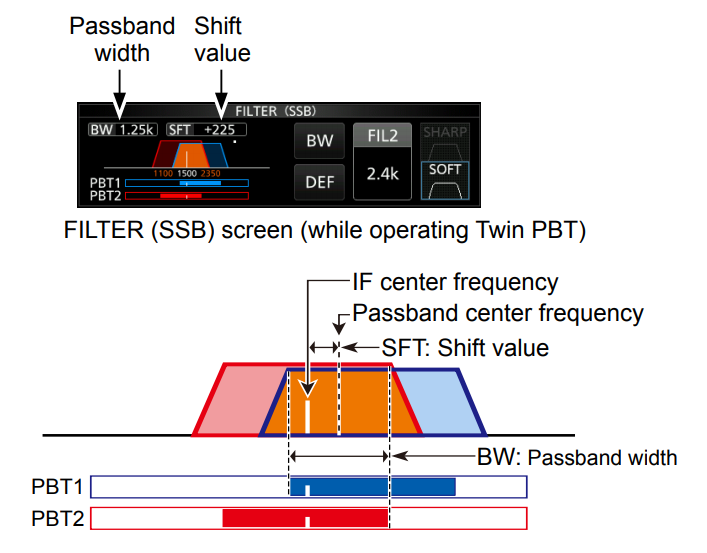
In general, the Twin PBT (Passband Tuning) electronically narrows the IF (Intermediate Frequency) passband width by shifting the IF frequency slightly outside of the IF filter passband to reject interference. The IC-7300 uses DSP for the PBT function. You can narrow the IF passband width by rotating both inner (PBT1) and outer (PBT2) Twin PBT controls the opposite direction from each other. A pop-up window graphically lets you watch the filter response changing width and moving signals around within the passband.
There are three default filter options available through the touch screen, as well as continuously variable bandwidth settings in the filter menu, accessed by holding the FIL button at the top center of the screen. CW bandwidth is adjustable using the tuning knob, and sharp or soft skirts can be selected for all modes.

Notch Filter
>Removes interference from inside passband
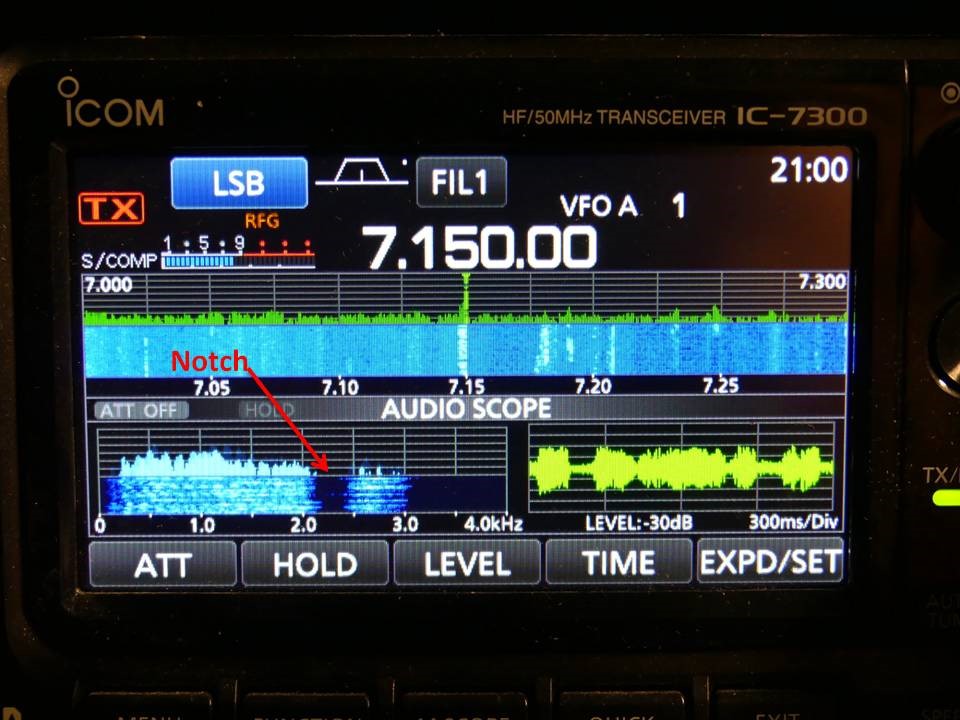
A Notch Filter is relatively narrow and removes a specific “chunk” of signal such as annoying heterodyne tones, tuner-uppers, etc. The filter is tuned to match the specific audio frequency of the interference. The IC-7300 has both Auto Notch and Manual Notch functions. Auto Notch is used in the SSB, AM, and FM modes; Manual Notch in the SSB, CW, RTTY, and AM modes.
Pressing NOTCHlets you choose AN (Auto Notch), MN (Manual Notch), or off. AN automatically attenuates unwanted signal. The Manual Notch attenuates by adjusting a frequency. Pushing WIDTH sets the Manual Notch filter width to WIDE, MID, or NAR. Slowly adjust POSITION to manually attenuate the frequency. Notice the blank space in the below photo of the audio scope between 2-3KHz which was removed.

Preamp/Attenuator
> Amplifies or reduces signal level
Preamps amplify signals in the receiver front end to improve sensitivity. A preamp is generally used when attempting to boost weak signals. If you use the preamp while receiving strong signals, the signal may be distorted. In this situation, turn off the preamp or activate the attenuator.
The IC-7300 has two preamps and an attenuator. To activate the preamp, push the P.AMP button; each push goes from P.AMP1 (most effective for HF bands) to P.AMP2 (most effective for 50MHz) to off. P.AMP1 does a reasonable job of improving copy without degrading signal to noise ratio.
The attenuator (ATT) prevents a received signal from becoming distorted when a very strong signal is near the frequency, or when a very strong electric field is near you (such as an AM broadcast station). Hold down the P.AMP/ATT button for one second to turn on the attenuator, and hold it down again to turn off the attenuator.
Go to the Source
These radio features can be very effective at reducing noise, but don’t overlook the obvious. Be sure everything is properly grounded and ferrites/chokes are used where applicable.
Also, take steps to reduce or eliminate the amount of noise generated in your environment whenever possible. Eliminating local noise sources and using your rig’s noise reduction features will increase your ability to copy signals significantly.

